Create MariaDB and phpMyAdmin containers locally via Docker
by Zois Roupas
Create MariaDB and phpMyAdmin containers locally via Docker.
Summary
Long time no see, right! 😅
Some time ago, and when I say some time ago I mean for more than 2 years now, I decided to stop creating VM’s in my local oVirt Manager for each service that I wanted to experiment on and started using docker containers. Between us, I tried vagrant for a bit but this wasn’t my cup of tee so I decided to use Docker.
I assume that whatever reason brought you to this article, you already know your way around docker containers but nevertheless I will try to explain as much as possible what this article is about and provide some major key points which are useful not only for the specific project but for docker handling in general.
As with all my posts, the main reason for this one is to keep some personal notes on what I did locally in order to make everything work based on my own need of having a central local db that will host multiple databases from different projects. Of course, as different people are reaching out to answer their questions or ask for support , hopefully this will be also helpful for other people out there.
In case you don’t have enough knowledge around docker and everything sounds like gibberish, please head to the docker starting page which is a great starting point.
Concept
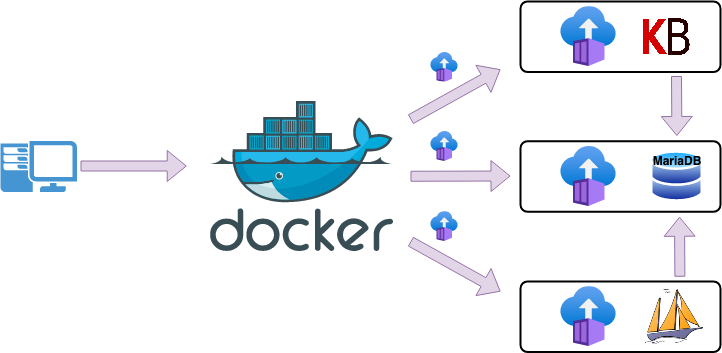
As already described, the initial idea was that I needed a main database server but didn’t want to have a VM running all the time. There are multiple articles and maybe I can also create one at some point on how I configured my own Galera Cluster in Docker but for now we will only focus to a single server.
One database container to rule them all! 😈
Configuration
Networking prerequisite
After some network related reading, some googling and multiple container deletions 😅, I decided to create a specific docker network so as 1) to be able to isolate specific docker containers and 2) because I had in mind that probably I will need an nginx-proxy and having their own network would save me from some networking trouble, but this is going to be part of my next article.
In order to create a new docker network, run:
docker network create customnetworkIf we want to check whether the new network is successfully created or which other local networks are available in our host, run:
docker network ls

4d59c36a3et5   bridge              bridge    local
47ee586abggv   host                host      local
f0a26628c86c   customnetwork       bridge    local
MariaDB Container
Now let’s create the configuration for our custom MariaDB container:
docker run -d \
        --name mariadb \
        --hostname mariadb.homelab.prv \
        --publish "3306" \
        --publish "4444" \
        --publish "4567" \
        --publish "4568" \
        --dns-search=homelab.prv. \
        --env MARIADB_ROOT_PASSWORD="somepassword" \
        --env MARIADB_USER="example-ruser" \
        --env MARIADB_PASSWORD="example-password" \
        --volume /docker_mounts/mariadb/datadir:/var/lib/mysql \
        --volume /docker_mounts/mariadb/conf.d:/etc/mysql/mariadb.conf.d \
        --network customnetwork \
        --restart always \
library/mariadb:latest
Before running the above, let’s see what we are doing in each option:
- --name : we override defult container’s name with a custom one,
- --hostname : we override the default hostname with our own one,
- --publish : we expose specific ports to the host so as to be reachable outside our container,
- --dns-search : we use DNS search domain to search non-fully-qualified hostnames,
- --env : next comes the environment variables for root password and an custom user,
- --volume : we mount mariadb datadir and conf dir to a specific path that we keep our mounted files,
- --network : we connect our container to our custom created network,
- the last parameter is the image used for our container which is the
mariadblatest one.
When we run the above command, docker will check if the image mariadb:latest is present on our host else it will pull the related layers and then create the container with the given option.
If no errors occured, we should see something like
$ docker ps
ceac6320a732   mariadb:latest        "docker-entrypoint.s…"   8 seconds ago   Up 7 seconds   0.0.0.0:56158->3306/tcp, 0.0.0.0:56159->4444/tcp, 0.0.0.0:56156->4567/tcp, 0.0.0.0:56157->4568/tcp   mariadb
We can also follow (-f) and check the container logs with:
docker logs mariadb -fNow that the container is up, we should be able to login to our newly created MariaDB docker container with multiple ways, either by creating a new maridb container that runs the mariadb command line client against our original mariadb container, allowing us to execute SQL statements against our database instance:
docker run -it --network customnetwork --rm mariadb mariadb -hmariadb -por by opening a shell to the existing container which will also allow us to run mariadb commands
docker exec -it mariadb /bin/bashroot@mariadb:/# mariadb -p
Enter password:
Your MariaDB connection id is 6
Server version: 11.0.2-MariaDB-1:11.0.2+maria~ubu2204 mariadb.org binary distribution
Copyright (c) 2000, 2018, Oracle, MariaDB Corporation Ab and others.
Type 'help;' or '\h' for help. Type '\c' to clear the current input statement.
MariaDB [(none)]> show databases;
+--------------------+
| Database |
+--------------------+
| information_schema |
| mysql |
| performance_schema |
| sys |
+--------------------+
4 rows in set (0.024 sec)Great, our new host is successfully created and accessible!
phpMyAdmin Container
Even though cli clients are awesome, software or web based clients are also a great option and oftenly even preferred by technical and non-technical people when it comes to more advanced database tasks.
For that reason and because I wanted to make sure that my docker containers can communicate with each other , I decided to create a phpMyAdmin container and connect it to my existing mariadb host.
phpmyadmin isn’t so compicated to run as you can see from the relevant command below and one of the reasons is because it doesn’t need a specific mount point as it doesn’t actually hold any data or config that you may need to change out of the box.
docker run --restart always --name phpmyadmin --hostname phpmyadmin.homelab.prv --dns-search=homelab.prv. -d -p 8081:80 -e PMA_HOST=mariadb --network customnetwork phpmyadminBefore running the above command, let’s see again what we are doing in each option apart from the already known ones that we already discussed in MariaDB section:
- -p 8081:80 : equivalent to
--publish, we expose container’s port 80 to our host 8081 port so as to be able to access the GUI, after the container is up and running. We will see how to do that in the next section. - -e PMA_HOST=mariadb : equivalent to
--env, we usePMA_HOSTvariable to define the address or the host name of our MariaDB server.
If you want to use phpMyAdmin to access multiple databases , then you will need alsoPMA_ARBITRARY=1variable.
Let’s check docker status after running the latest command.
$ docker ps
ceac6320a732   mariadb:latest        "docker-entrypoint.s…"   2 hours ago   Up 2 hours   0.0.0.0:56158->3306/tcp, 0.0.0.0:56159->4444/tcp, 0.0.0.0:56156->4567/tcp, 0.0.0.0:56157->4568/tcp   mariadb
24304fe258f2   phpmyadmin                "/docker-entrypoint.…"   5 seconds ago   Up 3 seconds   0.0.0.0:8081->80 tcp   phpmyadmin
Both containers are up and running! 🥳
Access our DB via GUI
Now it’s time to open phpMYAdmin GUI and try to connect to our MariaDB.
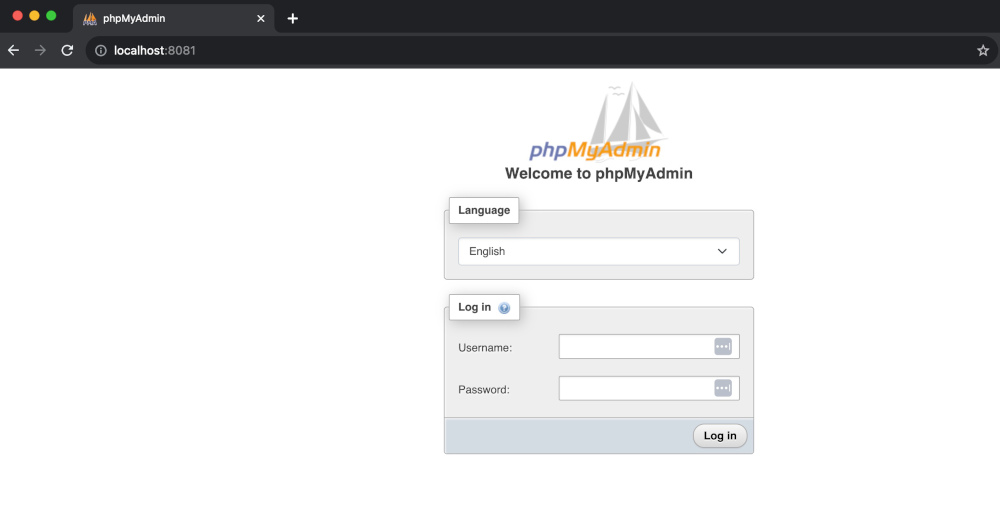
Open your favourite browser and type http://localhost:8081 as shown in the image below and you should be able to at least see the phpMyAdmin welcome message!
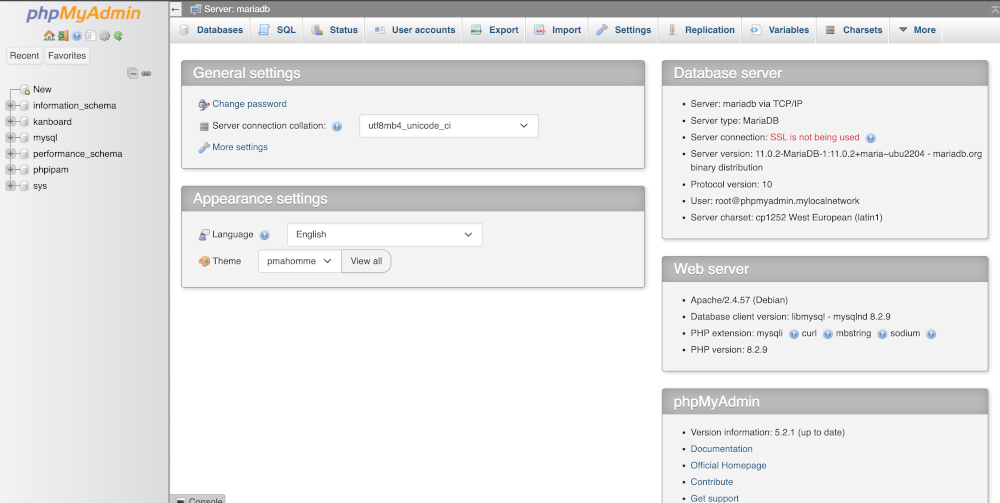
Final and most important part of the whole setup is to be able to login to our MariaDB host via GUI, as we did via terminal already in a previous step, and be able to see and created new databases and any other related config via GUI.
Use either root user and the MARIADB_ROOT_PASSWORD or credentials of the MARIADB_USER configured here.
If no errors occur, then you should see something like:
Awesome! 🥳
Final Words 💡
You may have spotted already in the last screenshot, that among other databases I have one called kanboard and one called phpipam.
This is because of the next step and the actual reason behind this idea as I want to keep my tasks tracked in a Kanban Board and this will be achieved with this amazing free open source Kanban project management software.
Let me point out that every configuration described in this article, can be packed into a file which can be applied via docker compose but this is not the time to go through it and this is where the other database phpipam comes into play! So stay tuned!
Thanks for reading, until the next post and as Dr Wallace Breen says in Half-Life 2..
Be wise. Be safe. Be aware!
Subscribe via RSS


