Create and Export Full oVirt VM Backups to NFS Storage Domain
by Zois Roupas
Create and Export Full oVirt VM Backups to NFS Storage Domain.
Now that I had my first virtual machine up and running and before moving on by configuring all the cool stuff that I had in mind, I needed to find a way to create daily virtual machine backups and store them in another device.
You see, the most common nightmare among system engineers is the absence of a backup policy 😱 !There are a lot of different approaches when it comes to backup and it depends on the provided services and its criticality!
You can have a Database backup, a File or Disk backup,a Bare metal or Virtual machine backup etc, then you have to decide if you want a Full or an Incremental one, Daily/Hourly/Weekly, locally or remotely and as you understand the task of creating a concrete backup policy can become a huge headache but in the end of the day is the only thing that will allow you to have some sleep at night!
Prerequisites 📝
- As documented in the official oVirtBackup repo, in order to be able to use this tool it is necessary to install oVirt Python-sdk. At the time that i configured this tool the python-ovirt-engine-sdk4 package wasn’t available to CentOS repository so have a look via yum or download it from here and install it via rpm as I did.
CentOS/Fedora
:~$ rpm -i python-ovirt-engine-sdk4-4.2.7-1.el7.src.rpm- (Optional) A package that is also used in this guide and which will be needed in order to clone the public repository of oVritBackup is git and if you haven’t installed it yet, then use the below command to do so.
yum install gitCreating and Attaching NFS Storage Domain
Configure NFS in QNAP ( Optional )
I will be using my QNAP NAS as an NFS server to store my backups remotely. If you have any machine lying around then you can setup your own NFS server without the need of a Nas. You can of course skip this step if you want to store the backups locally but keep in mind that the script that I will be using for backing up my virtaul machines needs an NFS export.
All major descent NAS devices provide NFS functionality, I’m using a QNAP TS-409 Pro which is quite old but does the job without any problems.
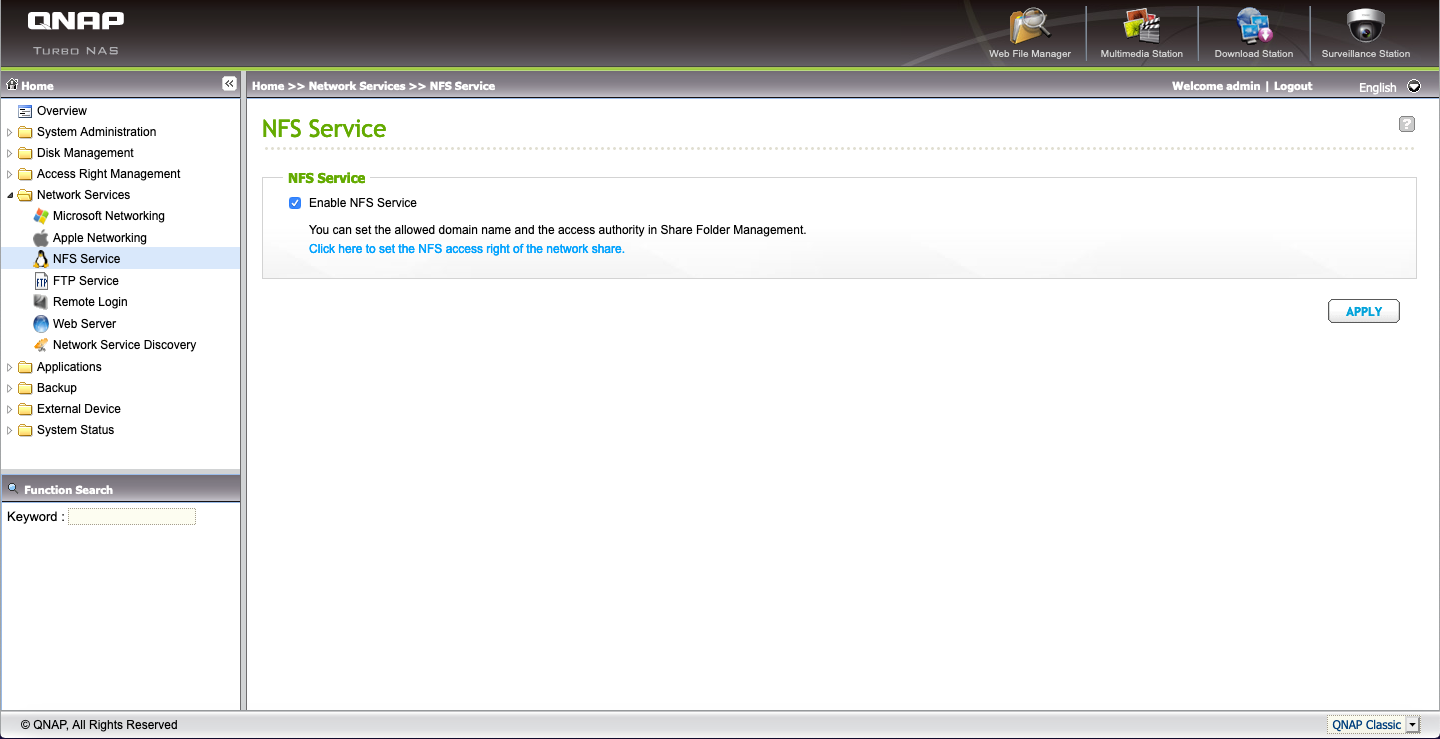
First step is to enable NFS service by going to Network Services -> NFS Service, click on Enable and then Apply. Then we have to create a New Folder and set the NFS rights for the network share.
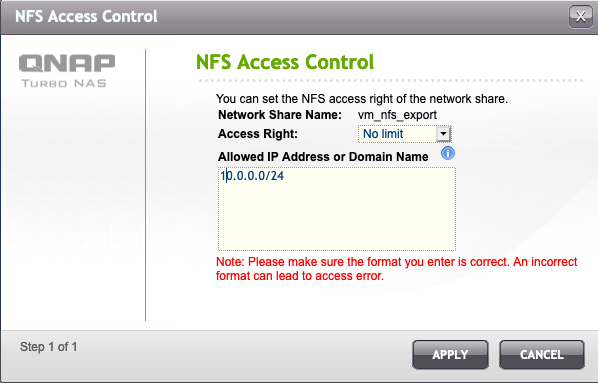
Go to Access Right Management -> Share Folders and click on New Share Folder. Follow the steps as you would in any other similar folder creation and after finishing choose NFS from the Action Column of the newly created folder ( we will give our folder an imaginative and original name, let’s call it nfs_share 😆 )
As you can see from the above screenshot I have given full rights from my /24 internal network but you can limit it for specific IP’s. Click Apply and our NFS share is ready to be attached to our oVirt Storage Domains.
Mounting NFS Share on CentOS7 (Optional)
You can bypass this section as this is not mandatory for the backup procedure. I would personally continue with the next steps as it will save you a lot of time and troubleshooting in case your NFS Export fails to be attached to our oVirt infrastructure.
First install the appropriate utils for your Centos7 to be able to act as an nfs client:
:~$ yum install nfs-utilsCreate the path that your NFS will be mounted on
:~$ mkdir /mnt/nfs_shareand edit your /etc/fstab like below by changing your IP and share folder name:
## You can also use your favorite editor
:~$ cat <<EOF >>/etc/fstab
10.0.0.4:/nfs_share /mnt/nfs_share/      nfs     defaults        0 0
EOF
Let’s mount our new share and create a file so as to make sure that we have Write Permissions which is of course required by oVirt export domain addition.
:~$ mount -a:~$ touch /mnt/nfs_share/test
:~$ ls /mnt/nfs_share/test
-rw-r--r-- 1 root root 0 May 02 17:43 test
:~$ rm -f /mnt/nfs_share/testPreparing and Adding NFS Storage Domain to oVirt
Fire up your favorite browser, type your oVirt endpoint or IP and login with your admin account. By now I guess you have seen my previous posts on local Certificate Authority and DNS configuration and you are familiar with your secure oVirt Administration Portal!
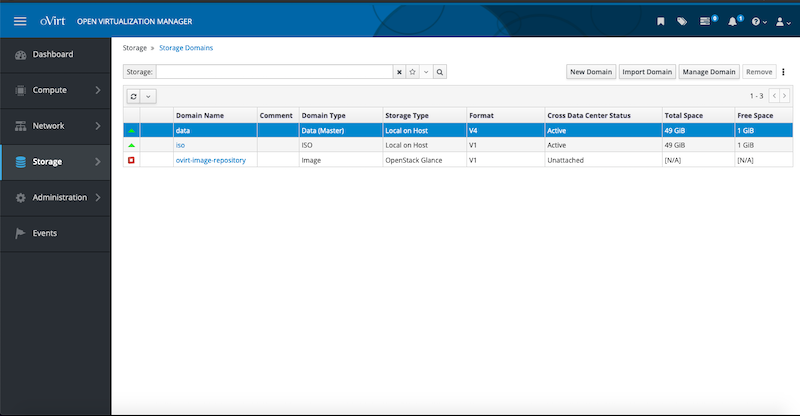
From the left panel go to Storage -> Domains. Now if you remember, and if not just have a look here ⬅️, in the storage domain configuration I used in the first part of my oVirt setup I added two domains, a Data and an ISO.
Time to add a new Export Domain!
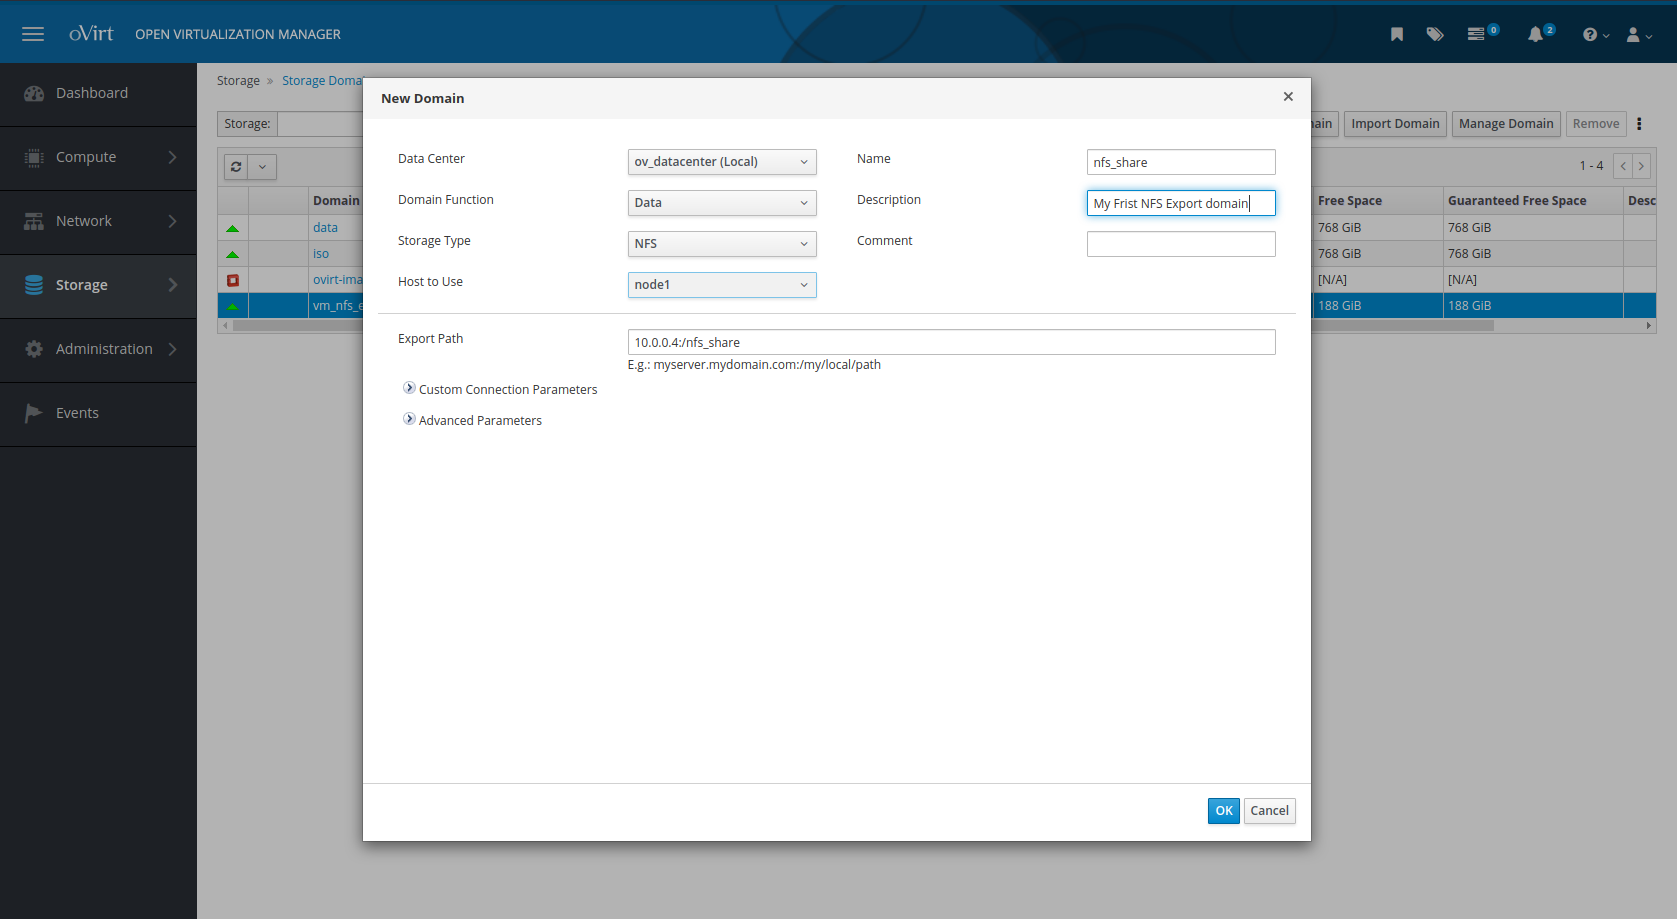
Click on New Domain and add a Name, a Description and Choose NFS for Storage Type. In the Export Path use either FQDN or IP followed by the nfs folder that we created in the previous step, in my case 10.0.0.4:/nfs_share and click OK.
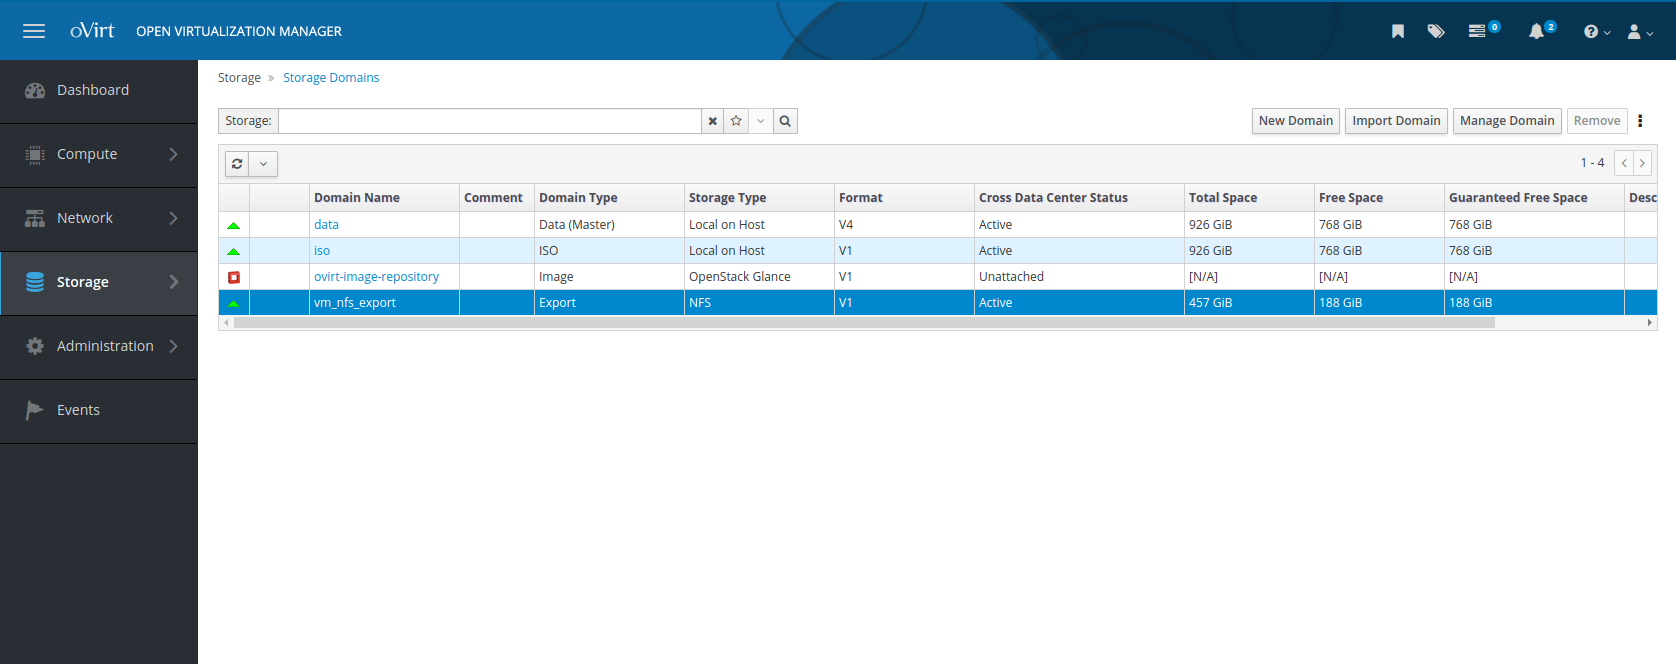
If everything is ok with the NFS configuration, you will be able to see your NFS in an Active status as well as the Total and Free Disk Space! If not though, check your NFS server configuration ( share permissions, IP or FQDN etc) or follow the previous section which documents the steps to mount NFS to our Centos7 and make sure that everything is configured exactly as they are documented.
Our NFS is now attached and ready to host all of our VM backups!
Creating and Exporting Full VM Backups with oVirtBackup Tool
oVirtBackup is a free tool written in Python which makes an awesome job on creating VM backups. I have been using this for the past months and never had a problem, this is a solid solution that you configure once and then forget about it.
More information can be found in it’s official repository and I will document my configuration in order to get this up and running.
Taken from the official Git page, the workflow that this script is using is:
- Create a snapshot
- Clone the snapshot into a new VM
- Delete the snapshot
- Delete previous backups (if set)
- Export the VM to the NFS share
- Delete the VM
oVirtBackup Setup
First step is to clone the repository! Navigate to your favorite folder or path that you keep your awesome scripts, run the following commands and
:~$ cd /home/user/scripts
:~$ git clone https://github.com/wefixit-AT/oVirtBackup.git
oVirtBackup Config
The only file that you need to update in order to start creating backups is the config.cfg (if this doesn’t exist just copy one from config_example.cfg).
:~$ cd /home/scripts/oVirtBackup
:~$ cp config_example.cfg config.cfg
Let’s have a look at the basic lines found in the config file and that you need to edit in order to have this up and running.
- A list of names which VM’s should be backed up
vm_names: [“myfirstvm”,”mysecondvm”] ## Check backup.py help for an option to backup all vm’s - Url to connect to your engine
server=https:///ovirt-engine/api - Username to connect to the engine
username=admin@internal - Password for the above user
password= - Name of the NFS Export Domain (the one that we created in our first section)
export_domain=nfs_share - The name of the cluster where the VM should be cloned
cluster_name=ov_cluster - Storage domain where the VM’s are located. This is important to check space usage during backup
storage_domain=data
</em> Optional : - Redirect log to a specific file
logger_file_path=/var/log/vmbackup.log - How long backups should be keeped, this is in days
backup_keep_count=1 - How many backups should be kept, this is the number of backups to keep
backup_keep_count_by_number=1
So open the config.cfg with your favor editor ,add or update the appropriate lines and save your changes.
Our First VM Backup!
Now we are ready to start our first ever VM backup, let’s see the availble options that can be used,
:~$ ./backup -h and let’s run it in a debug mode to see what happens!
:~$ /backup.py -c config.cfg -dIf everything is ok and no error occurs then you should see logs like the ones below
2020-06-22 04:00:01,745: Start backup for: myfirstvm
2020-06-22 04:00:01,846: Snapshot creation started ...
2020-06-22 04:00:05,176: Snapshot operation(creation) in progress ...
2020-06-22 04:00:10,268: Snapshot operation(creation) in progress ...
2020-06-22 04:00:15,357: Snapshot operation(creation) in progress ...
2020-06-22 04:00:20,437: Snapshot created
2020-06-22 04:00:30,533: Clone into VM (myfirstvm__20200622_040001) started ...
..
..
2020-06-22 04:01:33,503: Cloning in progress (VM myfirstvm__20200622_040001 status is 'image_locked') ...
2020-06-22 04:01:38,536: Cloning in progress (VM myfirstvm__20200622_040001 status is 'image_locked') ...
..
..
2020-06-22 04:02:59,918: Snapshot operation(deletion) in progress ...
2020-06-22 04:03:05,007: Snapshot operation(deletion) in progress ...
..
..
2020-06-22 04:07:21,170: Exporting in progress (VM myfirstvm__20200622_040001 status is 'image_locked') ...
2020-06-22 04:07:26,214: Exporting in progress (VM myfirstvm__20200622_040001 status is 'image_locked') ...
2020-06-22 04:07:31,251: Exporting finished
2020-06-22 04:07:31,278: Delete cloned VM (myfirstvm__20200622_040001) started ...
2020-06-22 04:07:33,485: Cloned VM (myfirstvm__20200622_040001) deleted
2020-06-22 04:07:33,485: Duration: 7:32 minutes
..
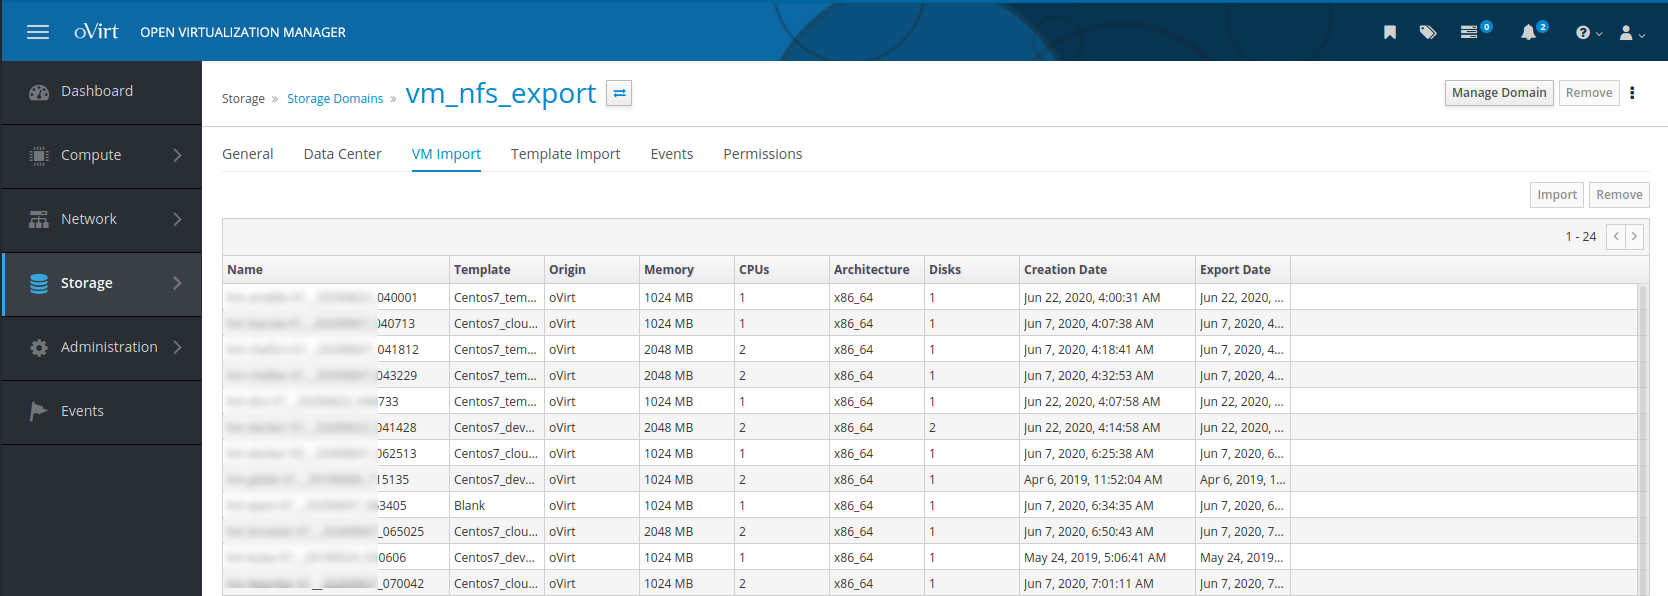
The exported backups can be then found by going to Storage -> Domains -> nfs_share -> VM Import.
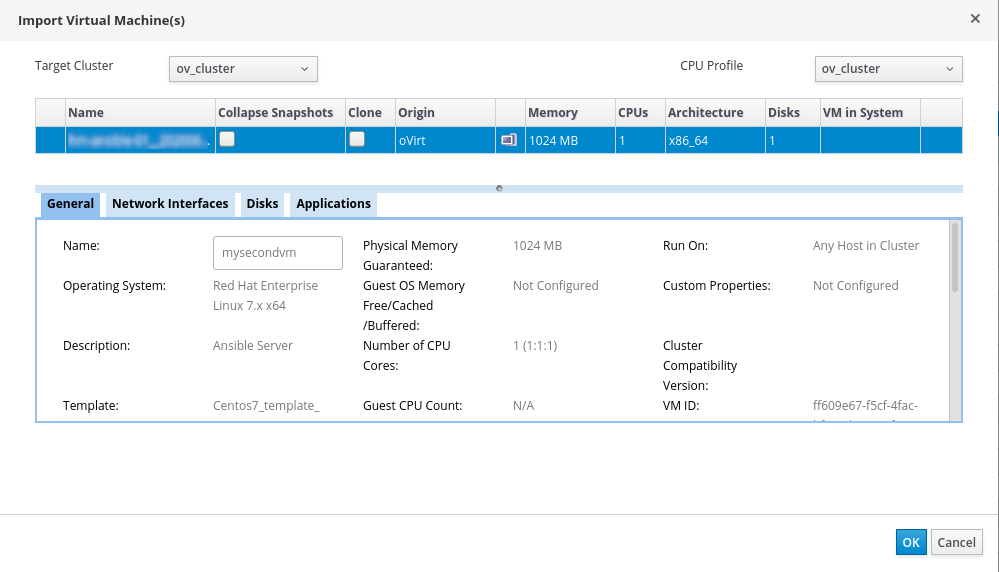
You can import any of the backups by right clicking and choosing Import.
So now that the command is tested manually, it’s time to add it in a cronjob and create as many backups as you like! I’m running a backup at 4:00 AM every Monday,Wednesday,Saturday and a backup of all my VM’s every 1st Sunday of each Month!
:~$ crontab -l
0 4 * * 1,3,5 /home/scripts/oVirtBackup/backup.py -c /home/scripts/oVirtBackup/running.cfg -d
0 4 1-7 * * [ "$(date +\%a)" = "Sun" ] && /home/scripts/oVirtBackup/backup.py -c /home/scripts/oVirtBackup/running.cfg -d -aHint: You can remove -d flag so as to avoid filling up your logs with unnecessary debug informaion. You can also add -a flag which will back all of your VM’s! Check –help as pointed out in previous section for more flag magic. 😉
Final Words 💡
I don’t know how you feel but I am way more relaxed now than I was before configuring this awesome free tool! A huge thanks to wefixit-AT which is the repo owner!
Our VM backups are successfully exported/imported to our NFS and can be used to either to revert to a previous state or even create a new VM to just get a configuration and then delete it!
Having backups to revert to in case of a miscofiguration or HW failure is great. Now we can safely move on with our next projects in line!
In the near future I will also document a simple script that I’m using to backup only the VM’s that are currently up and running, so stay tuned! 🎶🎶
Thanks for reading, until the next post and as Dr Wallace Breen says in Half-Life 2..
Be wise. Be safe. Be aware!
Subscribe via RSS

